Using a Game Pad
The Gamepad support in the XRP library works swith a single USB gamepad connected to the computer that is controlling the XRP. The computer recognizes that gamepad model and sends the control signals to the robot. With a gamepad you can write programs where an operator can control various aspects of the robot.
While this lets a person drive the robot, for the most robotic operations, we recommend using the buttons on the gamepad to control programed seequences, therefor making the XRP more accurate and fastest operating for the driver.
Supported Game Pads
There are many supported gamepads. We have tested with the Logitech and XBox USB gamepads with good results. To test if your Gamepad will work with XRPCode, go to web page https://hardwaretester.com/gamepad. If the buttons and joysticks work on the web site then you should expect that they will work with your XRP.
Use of gamepads requires a Bluetooth connection to the XRP
Gamepad support currently requires that the robot be connected to the laptop via a Bluetooth connection. If the robot is connected with a USB cable, you cannot also use a gamepad to control the robot. This will be fixed in an upcoming release of XRP code.
How to use the game pad in XRP programs
The program flow for a typical user control program is a loop that reads input values from the gamepad controller which is then interpreted by the program to either drive the robot or operate attached mechanisms.
The game pad can be accessed programatilcally in either of two ways:
1. Reading the values from the joysticks that range from -1 to 1 for full up to full down. These values might be applied to motor efforts (left stick to left motor and right stick to right motor) to drive the robot in tank mode.
2. Testing if a particular button is pressed could trigger any number of functions from moving the servo arm to a preset position, operating some user created mechanism connected to the robot, or run a sequence of code as a way of automating the roobt operation. When the button is pressed a value of 1 is and a value of 0 when not pressed.
The Gamepad class has two methods that are used to read the state of the gamepad. They are: Gamepad.X1, Gamepad.X2, Gamepad.Y1, and Gamepad.Y2. X1 and Y1 are for the left joystick and X2 and Y2 are for the right stick.:
get_value(axis)
where the axis is one of the constants described above.
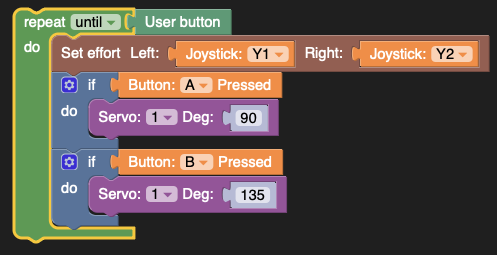
This sample program below will drive the robot by setting the left and right efforts from the gamepad joysticks Y-axis (tank drive), and will set the servo position to either 90 or 135 degrees depending on whether the A or B buttons are pressed:
from XRPLib.board import Board
from XRPLib.differential_drive import DifferentialDrive
from XRPLib.gamepad import *
from XRPLib.servo import Servo

board = Board.get_default_board()

differentialDrive = DifferentialDrive.get_default_differential_drive()

gp = Gamepad.get_default_gamepad()

servo1 = Servo.get_default_servo(1)

while not (board.is_button_pressed()):
    differentialDrive.set_effort((gp.get_value(gp.Y1)), (gp.get_value(gp.Y2)))
    if gp.is_button_pressed(gp.BUTTON_A):
        servo1.set_angle(90)
    if gp.is_button_pressed(gp.BUTTON_B):
        servo1.set_angle(135)
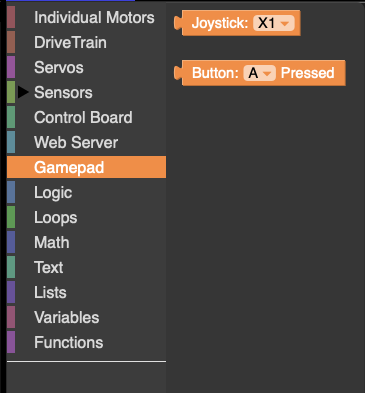
The Joystick block returns a -1 to 1 value based on the position of the selected Joystick axis. This is typically used for directly controlling the speed of motors, either the robot drive motors or mechanisms like arms.
The Button block returns a 0 (released) or 1 (pressed) for the selected gamepad button. This is typially used to trigger code or move a mechanism to a preset location.
This sample program below will drive the robot by setting the left and right efforts from the gamepad joysticks Y-axis (tank drive), and will set the servo position to either 90 or 135 degrees depending on whether the A or B buttons are pressed.